How to Mold a Mouthguard: Boil-and-Bite Fitting Instructions

Dr. Emrah YEŞİLYURT
Dr. Emrah Yeşilyurt is the Founder of Avangart Clinic. He combines advanced dental expertise with a genuine commitment to helping patients feel comfortable and informed about their oral health journey.
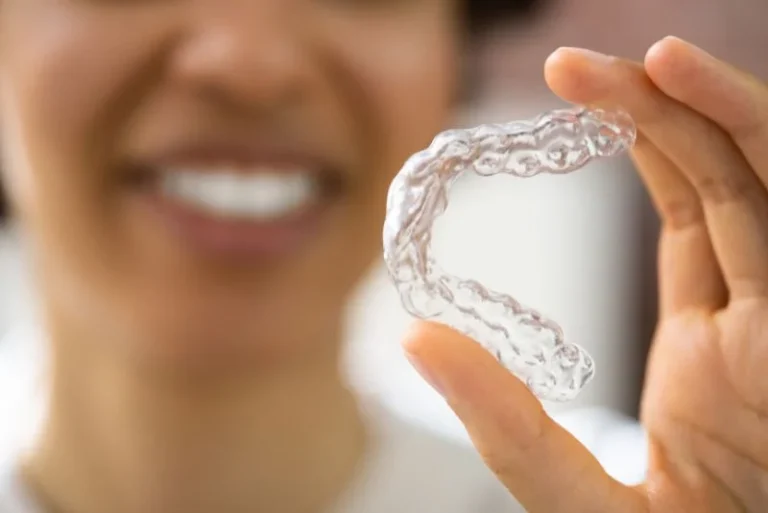
If you have just bought a boil-and-bite mouthguard, you can usually mold it at home in about five minutes. The key is to follow the timings closely. If the guard sits in hot water for too long, it can become too soft, lose its shape, or feel uncomfortable once it is in your mouth.
Learning how to shape a mouthguard properly is important, whether you are using it for contact sports or to protect against nighttime teeth grinding. A well-shaped guard should feel safe, fit snugly around your teeth and gums, and be comfortable enough that you don’t feel the urge to gag or struggle to breathe, while still protecting the tooth surfaces in a similar way to modern restorative dental coverings. A poor fit, by contrast, can shift during use or fail to protect the teeth as it should.
In this guide, we will show you the safe, step-by-step method to do it at home, including the timings to watch carefully and the signs that tell you whether the fit is right the first time.
- Disclaimer: This step-by-step guide is for informational purposes only. It is not dental advice. Over-the-counter mouthguards do not treat underlying clinical conditions. Please consult a licensed dental professional for a comprehensive evaluation and personalized treatment plan.
Types of Mouthguards: Which One Do You Have?
Before you start molding a mouthguard, you first need to know which type you are holding. This matters because only one of them is meant to be softened and shaped at home.
- mouthguards come pre-formed and ready to wear. They’re usually the cheapest option, but they can feel clunky, don’t fit tightly, and don’t follow the natural shape of your teeth and gums.
- Boil-and-bite mouthguards are the type this guide is written for. They are made from a material that softens with heat, so they can be shaped around your teeth for a closer fit.
- Custom-fitted mouthguards are made by a dentist using your dental impressions or a digital scan. Because they are tailored to your exact bite and dental structure, they are usually a better option for people with braces, frequent teeth grinding, TMJ-related symptoms, or anyone who plays contact sports regularly.
A simple way to tell what you have is to check the packaging. If it says boil-and-bite, mouldable, or at-home custom fit, you can usually form a mouthguard yourself by following the instructions carefully. If it is a stock guard, it will not reshape properly. If it is custom-made, it should never be boiled at home.
What You Will Need Before You Start
Before you mold mouthguard material at home, gather everything you need and keep it within easy reach. That way, you are not trying to search for a spoon or check the time while the mouthguard is already soft.
You will need:
- A boil-and-bite mouthguard
- A pot of boiling water
- A bowl of ice water
- A slotted spoon
- A timer or stopwatch
- A clean towel
- A mirror
If you have the manufacturer’s instructions, keep them beside you as well. When molding mouthguard material, a few seconds can make a real difference, so having everything ready before you begin makes the process safer and much easier to get right.
Step-by-Step Instructions: How to Mold a Boil-and-Bite Mouthguard
This is the part where timing really matters. Too little time in the water, and the guard stays stiff. Too much, and it can go overly soft and lose its shape before it even reaches your teeth.
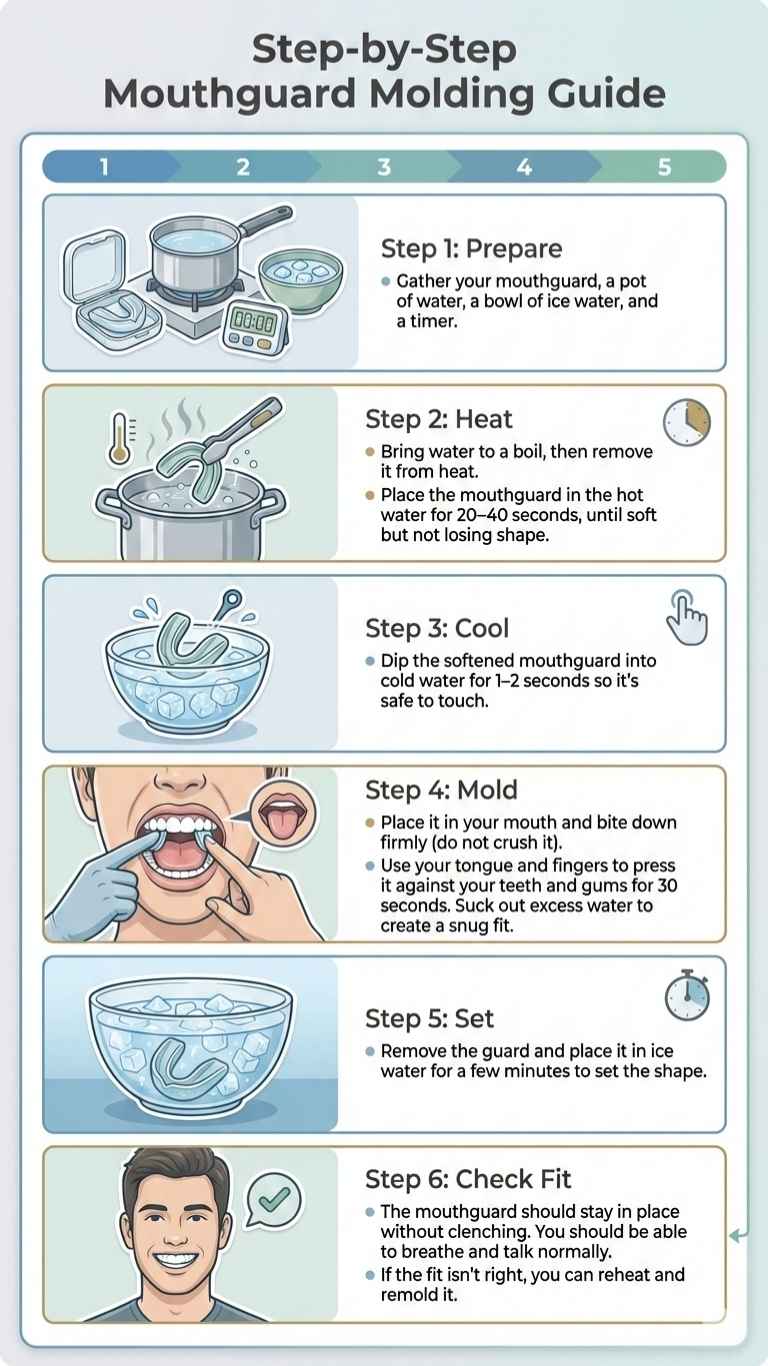
Step 1: Prepare Your Boiling Water and Ice Bath
Pour enough water into a pot to cover the mouthguard and bring it to a rolling boil. Once the water is boiling, take the pot off the heat before placing the mouthguard in. Keep the mouthguard gently submerged with a spoon or tongs rather than letting it rest on the bottom of the pan, so the plastic softens evenly and does not stick or warp.
That second part is important. If the mouthguard stays in a pan sitting on direct heat, the plastic can soften unevenly or stick to the bottom.
Set your bowl of ice water next to you before you start. You do not want to be scrambling for it once the mouthguard is soft.
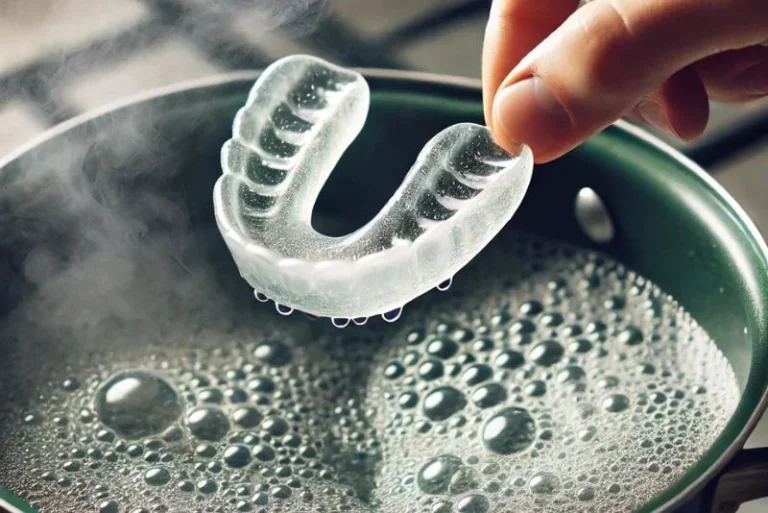
Step 2: Submerge the Mouthguard (Watch the Timer!)
Lower the mouthguard into the hot water with a slotted spoon and start timing straight away. Most boil-and-bite guards need around 30 to 60 seconds, but always check the box first, because some brands need less time and some need more.
Try not to let it sit against the bottom or side of the pot. You want it softened, not half-melted.
If the edges start curling or the guard looks floppy, it has probably been in too long. In that case, it is better to stop and check the product instructions before carrying on.

Step 3: Cool Briefly to Prevent Burns
Remove the mouthguard and submerge it in cold water for only 1 to 2 seconds. That is usually enough to cool the surface without making the whole thing go firm again.
It should still feel warm and soft, not hot and not stiff. If it feels too hot for your fingers, do not put it in your mouth yet.
Before you place it in your mouth, test it briefly with clean fingers against your lips. If it feels too hot to touch comfortably, give it another second or two to cool. It should feel warm and pliable, never hot enough to sting.
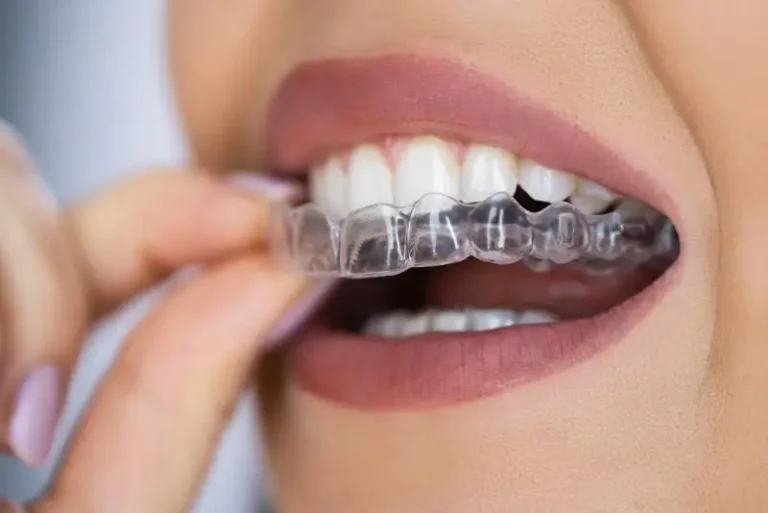
Step 4: Bite Down and Create a Vacuum
Place the mouthguard onto your upper teeth, unless your product says otherwise. Use your fingers to press it against the front teeth first, then bite down firmly enough to shape it, but do not clamp down so hard that your teeth cut completely through the softened plastic.
Now seal the fit. Press your tongue up to the roof of your mouth and suck in gently to pull out the air and water. This helps the guard hug your teeth more closely instead of just sitting over them.
While you do that, keep pressing along the front and sides with your fingers so it follows the shape of your teeth and gums. Hold everything in place for about 20 to 30 seconds, or for the time given by the manufacturer.
Step 5: Set the Mold in Ice Water
When the shape feels right, take the mouthguard out and place it straight into the ice water for 2 minutes. This helps it set properly and hold the shape you have just made.
Give it the full two minutes. If you take it out too early, it can soften slightly, and the fit may not be as clean as it first seemed.
How to Tell if Your Mouthguard Fits Correctly
After your mouthguard has cooled down completely, do a quick real-life check instead of just looking in the mirror. A good fit should be close and comfortable. It should not feel like something you need to keep adjusting every few seconds.
Here is what you want to notice:
- It stays on your top teeth when you open your mouth.
- It feels snug around the teeth and gums without needing you to bite down constantly to hold it there.
- It does not trigger your gag reflex or sit too far back in the mouth.
- It does not make breathing feel harder.
- You can speak, even if not perfectly, without the guard shifting around.
- It does not pinch, rub, or leave obvious sore spots along the gums.
- It feels even on both sides rather than tighter on one side and looser on the other.
A very simple test is to put it in and open your mouth naturally. If it drops down or shifts straight away, it has not moulded properly. You should not need to keep biting to hold it in place.
You can also judge the fit by how it feels after a few minutes. A properly fitted mouthguard should become less noticeable as you wear it. If all you can think about is the guard, there is usually a fit issue somewhere.
Troubleshooting: Can You Remold a Mouthguard?
Yes, in many cases you can. If the fit feels off after the first attempt, most boil-and-bite mouthguards can usually be reheated and shaped again once or twice.
A second attempt often fixes small mistakes, especially if the first moulding felt rushed.
That said, there is a limit. Reheating the mouthguard too many times or leaving it in hot water for too long starts to damage the material. Once that happens, the guard may become too soft, lose its structure, thin out in places, or stop holding a clean shape.
As a general rule, you can try again if:
- The fit feels loose
- The guard did not mould closely enough around the teeth
- One side feels tighter than the other
- You put it in too early, and it felt too hot to position properly
- The shape looked slightly off after cooling
It is usually better not to remould it again if:
- The material has become floppy or overly thin
- The edges have curled badly
- The surface looks warped
- The bite area no longer feels even
- The manufacturer says the guard is single-fit only
If you do remould it, follow the timing even more carefully the second time. Most problems happen because the guard has been over-boiled, not because it was not boiled long enough.
If the mouthguard still looks intact and just fits badly, it is often worth one more try. If it already looks distorted, worn out, or partly melted, reheating it again will usually make it worse, not better.
Caring for Your Mouthguard (Hygiene & Maintenance)
Once your mouthguard is fitted, keeping it clean needs to become part of the routine. It only takes a minute, but it makes a real difference. A mouthguard that is left damp or used again and again without proper cleaning can very quickly start to smell, feel unpleasant, and collect bacteria.
The easiest way to keep a mouthguard clean is to follow the same simple routine each time you use it:
- Rinse it with cool or lukewarm water after each use.
- Brush it gently with a soft toothbrush.
- Use a small amount of mild soap if it needs a better clean.
- Use a denture cleaner now and then for a deeper refresh.
- Let it dry fully before putting it away.
- Keep it in a ventilated case so moisture does not get trapped inside.
Try to avoid hot water when cleaning it. Too much heat can slowly affect the shape, especially with a boil-and-bite guard. It is also better not to scrub it with harsh toothpaste, because that can leave tiny scratches on the surface.
If the mouthguard starts to smell, looks cloudy, feels rough, or shows cracks, it usually needs replacing rather than just another rinse.
One small thing people often overlook is the storage case itself. If the case is not cleaned from time to time, you end up putting a clean mouthguard back into an unclean box.
Satisfied Patient Reviews
EXCELLENTTrustindex verifies that the original source of the review is Google. Service impeccable. Je suis venue pour des implants. La prise en charge a été rapide et la douleur pendant et après l’opération a été à peine ressentie. Clinique très professionnelle et chirurgien expert. Personnel très accueillant, en particulier la Directrice. Recommande à tous ceux qui sont à la recherche de professionnels pour régler des problèmes dentaires Suis venue finaliser la pose des implants et des couronnes. Résultat impécable!Posted on GoogleTrustindex verifies that the original source of the review is Google. I visited from England and had a positive experience. I went for a Hollywood Smile look and couldn’t be happier with them. The clinic was very aesthetic & clean, the staff were very attentive and supportive & I high recommend them.Posted on GoogleTrustindex verifies that the original source of the review is Google. İmplantlarımı ve zirkyonyumlarımı yaptırdım 2 sene önce iyiki yaptırmışım çok memnunum doktorum emrah hoca işinde çok iyi birisi tüm çalışanlara çok teşekkür ediyorum güler yüzlü anlayışları için gülşah hanıma ayriyetten teşekkür ederim 🌹Posted on GoogleTrustindex verifies that the original source of the review is Google. Çok güzel ve güveninirPosted on GoogleTrustindex verifies that the original source of the review is Google. Friendly and approachable staff, above all I haven’t experienced any pain what so ever, it does truly shows core professionalism. Coming from Wolverhampton, UK and made implant surgery with sinuslifting Gedi JafarPosted on GoogleTrustindex verifies that the original source of the review is Google. Ik Marco, hebt mijn gebit laten doen bij Avangart.. En ben door lieve mensen goed ontvangen en behandeld.. Kliniek zeer hygienisch en goede apparatuur.. Deze kliniek zo ik zeker aanraden om je laten behandelen..😁Posted on GoogleTrustindex verifies that the original source of the review is Google. I traveled from the U.S. and had Avantgart Clinic positively transform my smile in a manner that I wouldn’t have conceived as being possible. Dr. Egemen, a true master in his field, was patient, considerate, and communicative throughout the process and his assistant, Sevim, was a real joy to work with. Together, the two of them combined to make the overall experience much greater than I could have ever hoped for, and the end result is a smile that is on par with the most glamorous of Hollywood stars. I am extremely satisfied and would highly recommend Avangart Clinic to anyone looking to enhance their smile at a great price and of the highest quality.Posted on GoogleTrustindex verifies that the original source of the review is Google. Herkes mükemmel ıscılık mükemmel teşekkür edıyorumPosted on GoogleTrustindex verifies that the original source of the review is Google. Emrah bey‘in diş konusundaki tecrübesi, güler yüzü ve uzmanlığı nedeniyle diş tedavilerim için her seferinde Avusturya‘dan İstanbul’a gelmekteyim. Diş kliniği de son teknolojik donanıma sahip güven verici muayenehaneler içermekte.Posted on GoogleTrustindex verifies that the original source of the review is Google. Güler yüzlü ekip, temiz ve modern bir klinik. Tedavi sürecim baştan sona çok profesyoneldi. Gönül rahatlığıyla tavsiye ederim.Verified by TrustindexTrustindex verified badge is the Universal Symbol of Trust. Only the greatest companies can get the verified badge who has a review score above 4.5, based on customer reviews over the past 12 months. Read more
Boil-and-Bite vs. Custom Dental Mouthguards: When to See a Dentist
A boil-and-bite mouthguard can be a reasonable short-term option for casual sport or occasional use. If the fit is decent and the risk level is low, it may do the job well enough.
But there is a point where “good enough” stops being good enough. If you rely on a mouthguard regularly, have ongoing jaw symptoms, or need proper protection rather than a basic shop-bought fit, a custom dental mouthguard is the safer option.
A custom-fitted guard is made according to your exact teeth, bite, and dental structure. That means it does not just feel better. It is also designed around your overall smile and bite, much like a personalised cosmetic smile transformation. It usually sits more securely, protects more evenly, and takes up less unnecessary space in the mouth.
That last point matters more than many people expect. A bulky over-the-counter guard can feel awkward, make speaking harder, and in some cases affect how easily you breathe during sport or sleep. A well-made custom guard is shaped to protect your teeth without adding unnecessary bulk, which makes it more comfortable to wear and easier to tolerate during sport or sleep.
We would strongly recommend seeing a dentist if any of the following apply to you:
- You play contact sports regularly or at a competitive level
- You wear braces or other orthodontic appliances
- You grind or clench your teeth at night
- You wake with jaw pain, tooth sensitivity, or tightness around the TMJ
- Your current guard keeps slipping, feels bulky, or never seems to fit properly, especially if you have noticed gradual changes in your bite or tooth alignment.
- You have already tried remoulding an OTC guard, and it still does not feel right
At Avangart, we assess the bite, the condition of the teeth and gums, any signs of wear, and whether any pre-existing dental problems require treatment first, along with jaw joint or airway factors, before a guard is made. That gives you something designed for your mouth, not something you have had to force into shape at home.
If you only need a mouthguard now and then, a boil-and-bite option may be enough. Likewise, people looking for a temporary cosmetic improvement sometimes consider removable smile enhancement options before choosing permanent treatment. If you need reliable protection, have braces, or are dealing with teeth grinding or jaw discomfort, it is worth getting a custom-fitted guard made properly.
FAQs
Most boil-and-bite mouthguards need around 30 to 60 seconds in hot water, but the correct time depends on the brand and material. Always check the instructions on the box first, because leaving it in too long can make it overly soft and spoil the fit.
A good rule is to think in seconds, not minutes. If the mouthguard starts looking floppy or warped, it has probably been overheated.
We would be cautious here. If you wear braces, a standard over-the-counter mouthguard may not fit properly and can press against brackets or move teeth unevenly.
In most cases, the mouthguard is moulded to the top teeth. That is the most common design for both sports mouthguards and many boil-and-bite guards.
That said, always check the product instructions before fitting it. Some guards are made differently, and using the wrong arch can affect both comfort and protection.
In most cases, you can remould a boil-and-bite mouthguard by reheating it and repeating the fitting process from the start. Most can be reshaped once or twice, provided the material still looks intact and has not gone thin, warped, or floppy.
The key is to be more careful with timing the second time round. If the first fit was loose or uneven, a fresh attempt often helps. If the mouthguard already looks distorted or feels too soft, remoulding it again usually makes things worse rather than better.
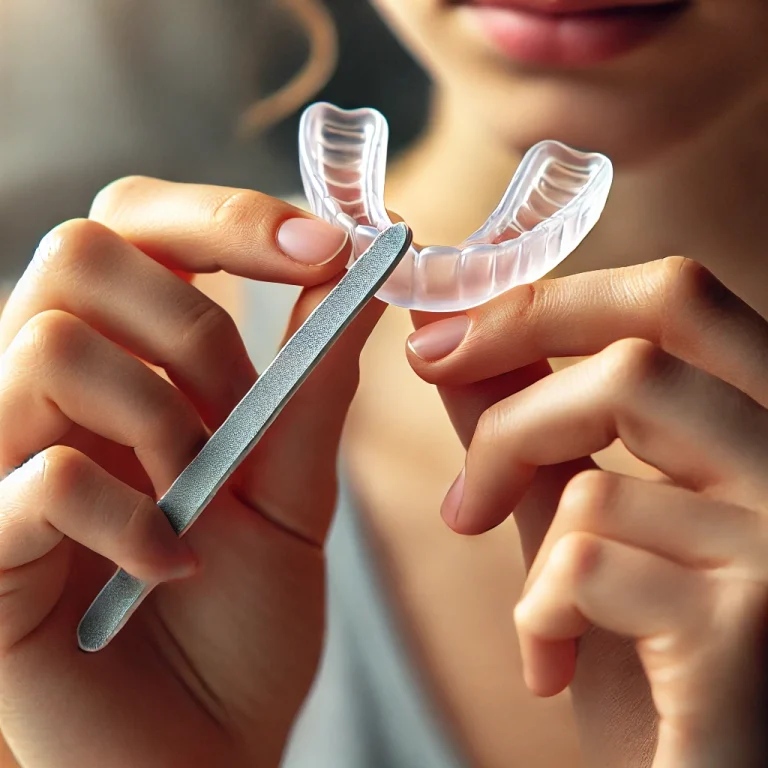
Sometimes, yes, but only if the manufacturer says trimming is allowed. Some boil-and-bite night guards can be trimmed slightly with sharp scissors to remove excess length at the back, especially if they feel too long or trigger gagging.
The important thing is to trim very little at a time. Cutting too much can affect coverage, comfort, and how the guard sits over the teeth. If the edges feel rough after trimming, they should be smoothed carefully. If you are unsure, it is safer to ask a dentist than to cut back too much and ruin the fit.
Get Maximum Oral Protection with Avangart Clinic
If your store-bought mouthguard still feels bulky, keeps slipping, or never seems to fit quite right, it may be time for a professional solution. The same applies if you are waking with jaw pain, clenching at night, or need a sports guard you can rely on.
At Avangart Clinic, we provide custom dental mouthguards designed around your teeth, bite, and comfort, while also offering advanced cosmetic treatments to enhance your smile. That means a more precise fit, better protection, and a guard that feels easier to wear, whether you need it for sport, sleep bruxism, or extra support for a sensitive jaw.
If an at-home mouthguard has not solved the problem, we are here to help you find a safer and more reliable fit.